Part 3 of Build Your Site or Blog on Docker, Traefik, & Ghost
Sorting out htpasswd
Before we get our Traefik 1.7 container up and running, we need to create a configuration file and an encrypted password so we can access the monitoring dashboard.
Install the htpasswd utility to create this encrypted password. You’ll need to figure out which package contains it for your linux distro. You could install the full httpd server package, but that is a waste of space. On CentOS, you can search for all the packages containing htpasswd with yum provides:
# yum provides *bin/htpasswd
Which should show you what packages contain what we are looking for:
Loaded plugins: fastestmirror
Loading mirror speeds from cached hostfile
 * base: linux.mirrors.es.net
 * epel: mirror.sfo12.us.leaseweb.net
 * extras: mirror.pac-12.org
 * updates: mirror.sfo12.us.leaseweb.net
httpd-tools-2.4.6-67.el7.centos.x86_64 : Tools for use with the Apache HTTP Server
    Repo        : base
    Matched from:
    Filename    : /usr/bin/htpasswd

httpd-tools-2.4.6-67.el7.centos.2.x86_64 : Tools for use with the Apache HTTP Server
    Repo        : updates
    Matched from:
    Filename    : /usr/bin/htpasswd

httpd-tools-2.4.6-67.el7.centos.5.x86_64 : Tools for use with the Apache HTTP Server
    Repo        : updates
    Matched from:
    Filename    : /usr/bin/htpasswd

httpd-tools-2.4.6-67.el7.centos.6.x86_64 : Tools for use with the Apache HTTP Server
    Repo        : updates
    Matched from:
    Filename    : /usr/bin/htpasswd

httpd-tools-2.4.6-67.el7.centos.6.x86_64 : Tools for use with the Apache HTTP Server
    Repo        : @updates
    Matched from:
    Filename    : /usr/bin/htpasswd
It looks like httpd-tools is the right package for CentOS, so let’s install it:
# yum install httpd-tools
Generating the Password
Now let’s generate a secure password for our Traefik monitoring dashboard. Substitute your_secure_password with the password you’d like to use for the Traefik admin user:
# htpasswd -nb admin your_secure_password
The output from htpasswd will look something like this:
admin:$apr1$ruca84Hq$mbjdMZBAG.KWn7vfN/SNK/
Copy and paste this entire line and keep it somewhere safe. We’ll use it in a little while.
Now we need to create a network inside Docker for all of the containers to share with the proxy (Traefik). Our containers will be able to talk to each other, but they will have to go through Traefik to get to the outside world. We’ll call this network traefiknet.
# docker network create traefiknet
Now that we have all of the prerequisites in place, it is time to create our Traefik configuration file.
Traefik is just another container, so I will save its configuration file in a directory inside /opt as I do with all of my other containers. Create the directory and move into it:
# mkdir -p /opt/traefik
# cd /opt/traefik
Time to Create Our Files
In the traefik directory, we can now create the 3 files we need. First, traefik.toml:
debug = false
checkNewVersion = true
logLevel = "ERROR"
defaultEntryPoints = ["https","http"]

[web]
address = ":8080"
[web.auth.basic]
users = ["admin:$apr1$ruca84Hq$mbjdMZBAG.KWn7vfN/SNK/"]

[entryPoints]
[entryPoints.http]
address = ":80"
[entryPoints.http.redirect]
entryPoint = "https"
[entryPoints.https]
address = ":443"
[entryPoints.https.tls]

[retry]

[docker]
endpoint = "unix:///var/run/docker.sock"
domain = "EXAMPLE.COM"
watch = true
exposedbydefault = false

[acme]
email = "YOUR EMAIL ADDRESS"
storage = "acme.json"
entryPoint = "https"
[acme.tlsChallenge]
OnHostRule = true
The different sections of this file start with a word in brackets. Before the first section, we set some logging and other administrative options and defaultEntryPoints = ["https","http"]. Setting those defaults will allow us to route traffic coming in over ports 80 (http) and 443 (https). We’ll force everything to run over an encrypted connection in a little bit.
[web] section:
This is where we set up the port for the Traefik dashboard and set up our user and password. This is where you paste the output from htpasswd. If you leave out web.auth.basic and the users line, the Traefik dashboard will be available for everyone to see. You can also specify additional login by separating them with commas.
[entrypoints] section:
The http entry point handles port 80, while the https entry point uses port 443 for TLS/SSL. We will redirect all of the traffic on port 80 to the https entry point to force secure connections for all requests.
[retry] section:
This tells Traefik to resend a request if there is a network error.
[docker] section:
This is where we configure Traefik to use Docker as a backend. Because we are using CentOS, we need to set the socket endpoint. The domain setting is the default domain for the server. Although this is a default, it won’t be used very often because we will usually specify domains per container by setting the traefik.domain label. I’ll discuss that in the next post when we set-up Ghost. The watch setting tells Traefik to watch Docker for changes and dynamically update itself when new containers come online. If you set exposedbydefault to true, then all containers will be exposed immediately upon creation. Instead, we will specify the containers that we want to expose with the traefik.enabled=true label.
[acme] section:
This is the section where we configure Let’s Encrypt certificates support. Acme is the name of the protocal that is used to communicate with Let’s Encrypt. To have Traefik generate certificates for our hosts, replace YOUREMAILHERE with your actual email address. The storage setting specifies that we will store the information from Let’s Encrypt in a JSON file called acme.json. We will create that file in a few minutes. The entryPoint setting needs to point to the entry point handling port 443, which in our case is the https entry point. The onHostRule tells Traefik to generatea certificate as soon as our containers with specified hostnames are created. If we wanted to wait to create the certificate until the first time that a request is made, we’d use a setting called onDemand. Using onDemand would result in a much longer response time for the first visitor, so I prefer the onHostRule method.
This part is actually amazing. Traefik is going to dynamically manage all of the certificates for any domain or subdomain that you add to your configuration. For every Host rule that appears in Traefik, it will communicate with Let’s encrypt, obtain a key and certificate, and store them in the acme.json file. Since all of the SSL/TLS certificates are managed at the proxy (Traefik), you can change your endpoints (or backends in Traefik parlance), set-up load balancing, etc. without worrying about your encryption configuration.
For example, I am going to point
frankanderson.comat a Docker container running the blogging software Ghost. If I ever decide to move to another blogging system like Wordpress or Jekyll, then all I have to do is set-up a new container in Docker and tell Traefik that frankanderson.com now points to the new container. To anyone connecting tofrankanderson.com, the change will be seamless.
Create docker-compose.yml
Second, create docker-compose.yml for the Traefik container in the /opt/traefik directory:
version: '2'

services:
  traefik:
    image: traefik:1.7-alpine
    command: --docker
    restart: always
    ports:
      - 80:80
      - 443:443
    networks:
      - traefiknet
    volumes:
      - /var/run/docker.sock:/var/run/docker.sock
      - /opt/traefik/traefik.toml:/traefik.toml
      - /opt/traefik/acme.json:/acme.json
    labels:
      - "traefik.frontend.rule=Host:monitor.yourdomain.com"
      - "traefik.port=8080"
    container_name: traefik

networks:
  traefiknet:
    external: true
What are we telling it to do:
- Pull the Traefik docker image. I use the alpine version because it is compact.
- Restart after a reboot.
- Map the HTTP and HTTPS ports to the Docker host so that Traefik receives all traffic over ports 80 and 443.
- Connect to the special Docker network named
webthat we created earlier. - Mount the Docker sock so that it can communicate with the Docker daemon.
- Mount the traefik.toml configuration file.
- Mount the file that will hold our Let’s Encrypt information.
- Tell Traefik that this container responds to requests for monitor.yourdomain.com.
- Tell Traefik that this container’s service is listening on port 8080.
- Name this container.
The labels are where all the magic happens. I’ll discuss them more in the next post.
Third, create an empty file which will hold our Let’s Encrypt information:
# touch acme.json
As you may recall from the docker-compose.yml file for Traefik, we’ll mount this file inside the Traefik container.
Then lock down the permissions so that only root can read and write this file:
# chmod 600 acme.json
You may be wondering why we have to create
acme.jsonbefore we mount it in a Docker container when Docker will create directories all by itself. The answer is that Docker assumes that a non-existant mountpoint in the host system will be a directory, not a file. So if you want ti to mount a file, you need to create it before initializing your container.
Create the Traefik container
Now we are finally ready to create the Traefik container. In the /opt/traefik directory, run the following command:
# docker-compose up -d
Which will result in something like this:
Pulling traefik (traefik:1.7-alpine)...
1.5-alpine: Pulling from library/traefik
1160f4abea84: Already exists
a78c1a84a903: Pull complete
e9fdce1a9c16: Pull complete
d53bedac0888: Pull complete
Digest: sha256:4d3a34a2dd3f6e030cdb1ed3ce602e5b919d7810d4b60aacbcda9156d56ca349
Status: Downloaded newer image for traefik:1.5-alpine
Creating traefik ...
Creating traefik ... done
It will take a few seconds to download the image and initialize the container, but once everything is done you can go to (if you set up your CNAME as described earlier).
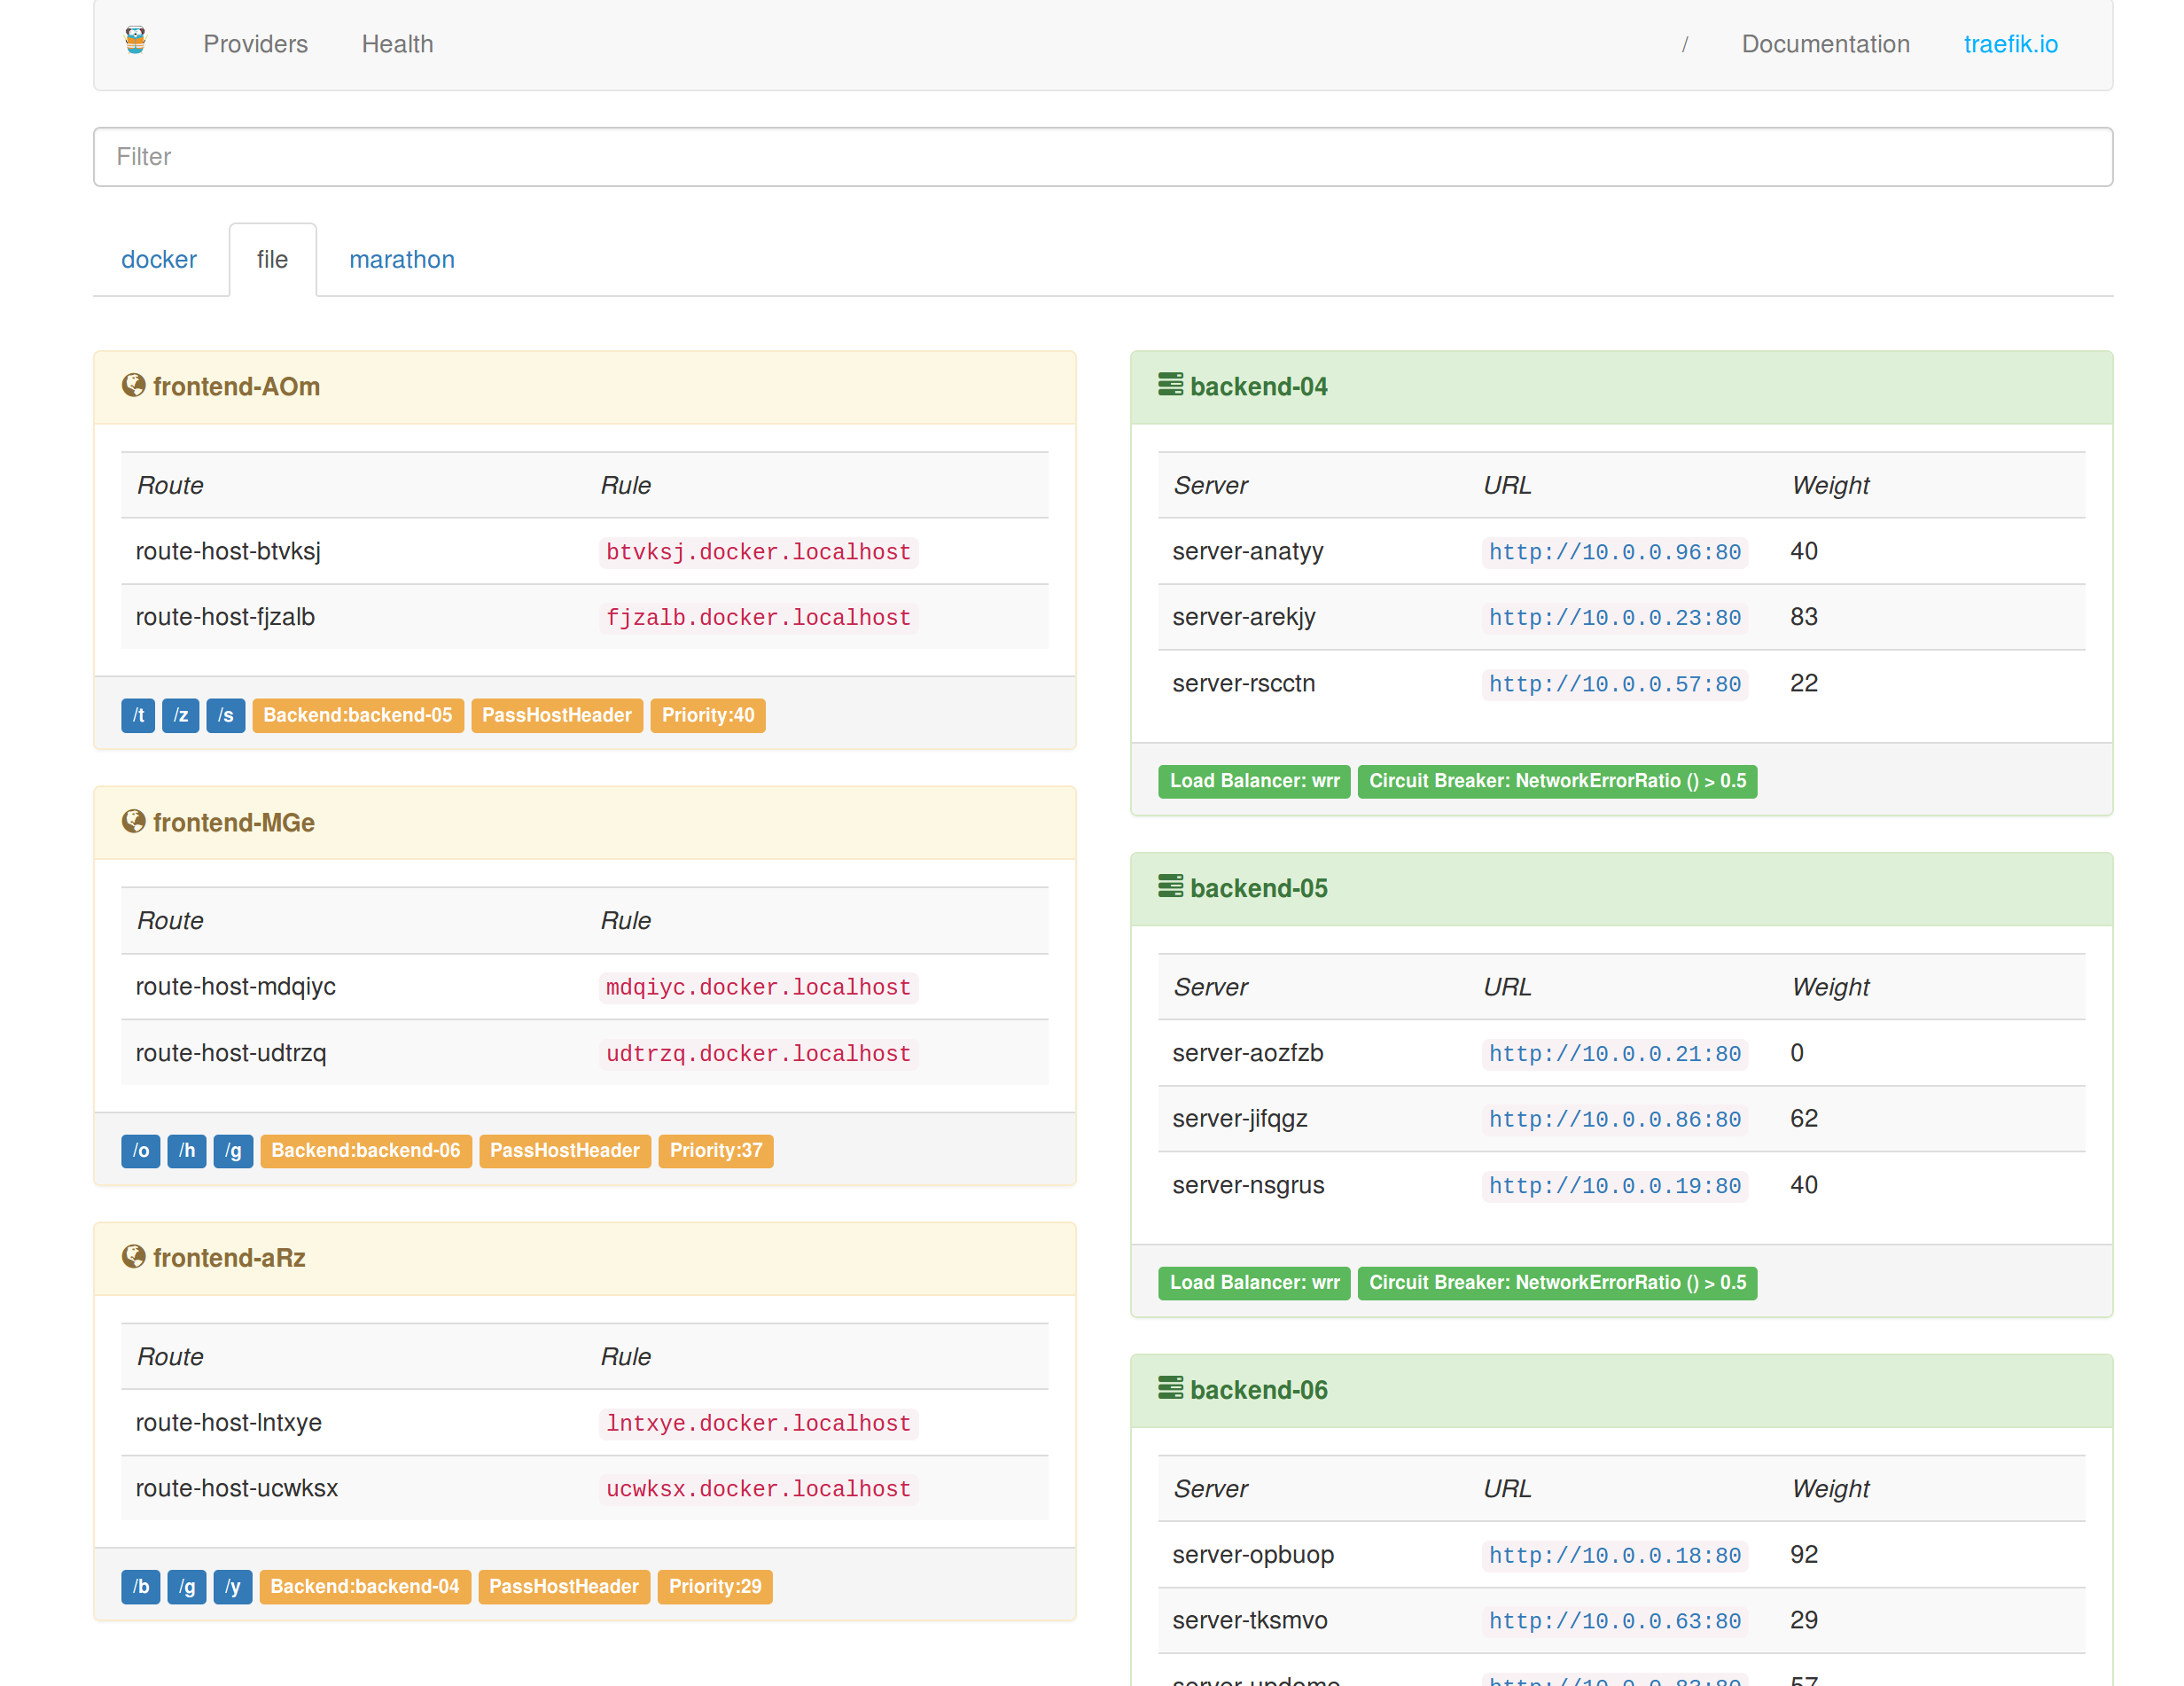
If everything is working as intended, you’ll be asked to enter your username and password and then see something like this:
In my next article, I’ll discuss the comparatively easy task of adding containers to Traefik and Docker.